Nuno Felting for Beginners: Wool Felted Through Fabric
4 min read Intermediate
We may earn a commission from links on this page, at no extra cost to you. As an Amazon Associate I earn from qualifying purchases. Learn more.
The technique that makes felt light enough to wear in warm weather. How wool migrates through an open weave, how much to use, and why less is always more.
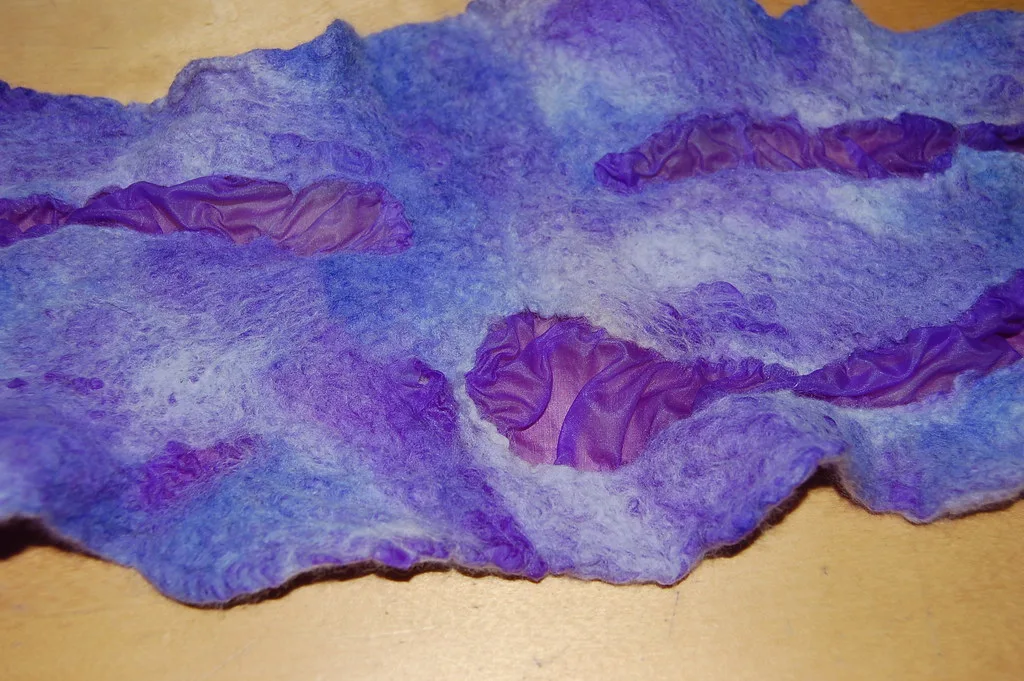
Nuno felting bonds wool to a woven fabric instead of to itself. The wool fibres migrate through the gaps in the weave, felt on the far side, and lock the two materials together permanently. The result is a textile far lighter and more drapey than felt alone — light enough to wear as clothing rather than as outerwear.
The name comes from the Japanese nuno, meaning cloth. The technique was developed in the 1990s by Polly Stirling and Sachiko Kotaka in Australia, specifically to make felt wearable in a hot climate.
How it differs from ordinary wet felting
In standard wet felting, wool felts to wool and you control thickness by adding layers. In nuno felting the fabric provides the structure, so the wool is only there to bond and to shrink.
Two things follow, and both are counter-intuitive:
- You use far less wool — a thin veil, not a layer.
- The fabric puckers. Wool shrinks by a third; the fabric does not shrink at all. The fabric has to go somewhere, and it gathers into ripples and texture. That texture is the whole point of nuno felting, not a fault.
What you need
- Fine merino tops, 18–19 micron. Fineness is not optional here — coarse fibre will not pass through a fine weave. 30–50 g for a scarf.
- An open-weave fabric. Silk gauze, chiffon, cotton muslin or scrim. See choosing nuno fabrics.
- Bubble wrap, net, olive oil soap, hot water, a pool noodle.
Step 1: Prepare the fabric
Wash and dry new fabric first. Manufacturers apply sizing and finishes that block fibre migration, and an unwashed piece can simply refuse to bond.
Lay the fabric flat on the bubble wrap. If it is very fine, smooth it carefully — creases become permanent.
Step 2: Lay the wool very thinly
This is where every beginner uses too much.
Pull the finest wisps you can from the wool top — so thin they are translucent — and lay them on the fabric. You should be able to read text through the wool layer. If you cannot see the fabric clearly through the fibre, you have used too much and you will end up with ordinary felt that happens to have cloth stuck to one side.
You do not need to cover the whole fabric. Nuno works beautifully as bands, spots or a scattering across a sheer ground, leaving areas of bare fabric between. Just remember that felted areas shrink and unfelted areas do not, so the pattern controls where the piece gathers.
Step 3: Wet it down carefully
Cover with net. Sprinkle hot soapy water and press gently through with flat hands. Do not pour — a thin wool veil moves easily and once it has shifted you cannot tidy it.
Step 4: Rub lightly and patiently
Rub through the net in small circles with very little pressure. Nuno felting is slower than ordinary wet felting because the fibres have to travel through the weave before anything holds.
After ten minutes, lift a corner of the fabric and look at the underside. You are looking for fine wool fibres poking through to the back. When you can see them across the whole piece, migration has happened and you can work more firmly.
Step 5: Roll
Roll the piece around a pool noodle inside the bubble wrap and roll it under your forearms, a hundred at a time, changing direction each cycle as with any wet felting. The fabric will start to pucker and the piece will noticeably shrink and stiffen.
Four to six cycles is typical.
Step 6: Test the bond
Pinch the wool and pull gently away from the fabric. If any wool lifts, keep working. Properly bonded nuno felt cannot be separated — the wool and cloth behave as one material.
Step 7: Rinse and finish
Rinse warm, then cool with a splash of vinegar. Squeeze, roll in a towel, and lay flat to dry.
You can either preserve the puckering — which most people want — or stretch and iron the piece flat for a smoother surface. Decide before it dries, because it sets.
Common problems
- The wool will not go through. The weave is too tight, the wool is too coarse, or the fabric still has sizing on it. Any of the three will stop it.
- It came out stiff and heavy. Too much wool. This is by far the most common first-attempt result.
- Wool peeled off after drying. Under-felted — migration started but was never completed.
- The fabric tore. Very fine silk can tear under aggressive rolling. Work more gently, or choose a slightly sturdier fabric while learning.
What to make first
A small sample, 30 × 30 cm, using several different fabrics in strips on the same piece. One session tells you more about how each fabric behaves than any amount of reading, and gives you a shrinkage reference for planning sizes.
After that, a long narrow scarf is the classic first real project — the same construction as a wet felted scarf, but a fraction of the weight.
Frequently asked questions
What is nuno felting?
Wool felted through an open-weave fabric rather than to itself. The fibres migrate through the weave and lock on the far side, producing a textile that is far lighter and drapier than felt on its own.
How is nuno felting different from ordinary wet felting?
Much less wool, laid far more thinly, and a much gentler start. The wool only has to travel through the fabric rather than build a fabric of its own, so heavy rubbing at the beginning ruins it.
Why is my wool not sticking to the fabric?
Either the weave is too tight for the fibres to pass through, the fabric still has its mill finish on it, or the wool was laid too thickly to migrate. Hold the fabric up to the light: if you cannot see through it, it will not work.
How do I know when nuno felting is done?
Pinch the wool and lift. If the fabric comes with it and nothing separates, the bond has formed. If the wool lifts away on its own, it needs more time.