Wool Blending Board: How to Use One, and Whether You Need One
4 min read Intermediate
We may earn a commission from links on this page, at no extra cost to you. As an Amazon Associate I earn from qualifying purchases. Learn more.
A board of carding cloth on a frame lets you paint a colour blend fibre by fibre and pull it off as a rolag. What it does that carders cannot, and how to build one.
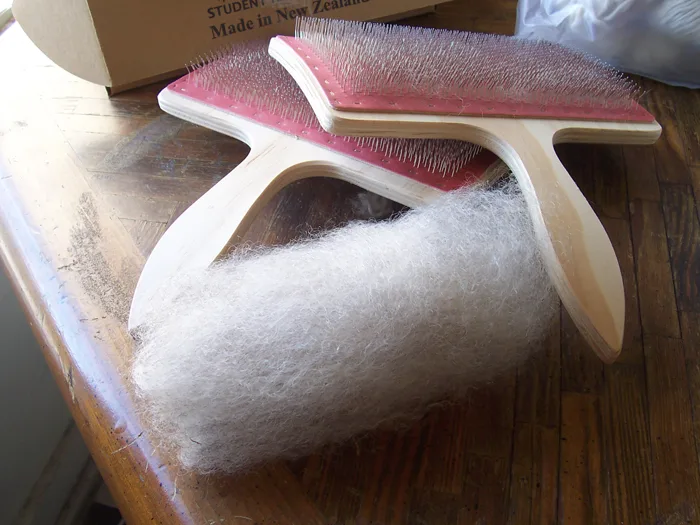
A blending board is a rectangle of carding cloth — the same bed of fine bent wire teeth found on hand carders — mounted flat on a board with a handle or a brace. You lay fibre onto it with a brush, in whatever arrangement you like, and then roll it off as a soft tube of fibre called a rolag.
Its point is control. Hand carders and drum carders both work by passing fibre between two toothed surfaces, which mixes it. A blending board only has one surface, so nothing gets mixed unless you deliberately put it on top of something else.
What it does that carders cannot
- Keep colours separate in one rolag. Stripe red, orange and yellow across the board and the rolag comes off striped, so the colour changes as you draw from it.
- Build a gradient. Overlap thin layers so one shade fades into the next — the fibre equivalent of a wash.
- Add texture on purpose. Silk noil, locks, sari silk, angelina and nepps can be laid on the surface and stay where you put them.
- Work small. A 20 g rolag of a bespoke blend takes about five minutes. Setting up a drum carder for that is absurd.
If what you actually want is one even colour from two, hand carders do that better and cost less — see carding wool by hand and how to blend wool colours.
Choosing a board
- Size. 30 cm square is the common size and holds 30–60 g. Smaller boards are cheaper and fine for felters; larger ones suit spinners making matching batches.
- TPI (teeth per inch). 72 TPI for fine wool such as merino, silk and blends. 48–56 TPI for coarse wool, longwool and locks. If you buy one board, take the finer cloth — coarse fibre still works on it, badly-held fine fibre does not.
- Brace or clamp. A board that sits still while you brush is worth more than any other feature. A batten along the bottom edge to press against a table is enough.
- Dowels. Two smooth sticks are supplied for rolling rolags off. Any 10 mm dowel works; keep spares.
How to use a blending board
- Brace the board against a table edge, cloth facing you, tilted back slightly.
- Load the first layer. Hold a length of tops in one hand and brush the ends onto the cloth with a small brush or your fingers, starting at the bottom and working up. Thin passes. The teeth should be holding fibre, not buried in it.
- Build up. Add further layers and colours. Anything you put on last will be most visible in the finished rolag, so put your highlight colours on top.
- Add texture last. Sprinkle silk, locks or sparkle across the surface and press it in gently with the brush.
- Roll off. Slide one dowel under the fibre at the bottom edge, lay the second on top, pinch and roll upwards, keeping steady tension. The fibre lifts off the teeth as a tube.
- Ease it out. Slide the dowels apart and out. Give the rolag a gentle stretch along its length to loosen it.
Two rolags come off a full board if you split the fibre left and right as you roll — useful when you want a matched pair.
Using rolags for felting
Rolags are usually thought of as a spinner's product, but they suit felting well:
- Needle felted coats. A rolag blended from three browns gives an animal a coat with depth rather than a flat single colour. See needle felting fur.
- Shading in flat work. Gradient rolags pull apart into veils that already change colour — ideal for skies and hills in wool painting.
- Wet felted surfaces. A rolag opens out into a soft airy layer that lays down more evenly than combed tops.
Making your own
The commercial boards are simple objects, and a homemade one performs identically if the cloth is right.
- Cloth. Buy a piece of carding cloth in the TPI you want. This is the one part you cannot substitute — slicker brush pads are too coarse and too small.
- Base. 12 mm plywood or MDF, cut about 2 cm larger than the cloth all round.
- Fixing. Contact adhesive across the whole back of the cloth, then staples or tacks around the edge through the border. Cloth that lifts in the middle will grab the rolag as it comes off.
- Edging. A thin batten glued along each side hides the staples and protects your hands.
- Brace. A block screwed to the back of the bottom edge, so the board can hook over a table edge.
Expect to spend rather less than half the price of a bought board, most of it on the cloth.
Is it worth buying?
For a felter who buys ready-dyed tops and works in single colours, no. For anyone doing colour work — shaded landscapes, realistic animals, custom blends from dyed scraps — it is the tool that makes the blend deliberate rather than accidental. It also rescues leftovers: a board turns a box of dyed ends into rolags you actually want to use, alongside the leftover-fibre uses in wool roving crafts.
Frequently asked questions
What does a wool blending board do?
It holds fibre on a flat bed of carding cloth so you can lay colours down deliberately, in layers or stripes, then lift the whole arrangement off as a rolag with the blend intact. Unlike carders, it does not mix the colours into one shade unless you want it to.
Is a blending board better than a drum carder?
They do different jobs. A drum carder processes volume and mixes thoroughly; a blending board is small, controlled and keeps colours separate. If you want kilos of blended batt, buy the carder. If you want painterly gradients in 30 gram batches, buy the board.
Can you use a blending board for needle felting?
Yes, and it is underused for it. Custom blends for animal coats, gradient fibre for shading, and neat little rolags of exactly the colour mix you need are all quicker on a board than on carders.
How do you make a blending board?
Staple or glue a piece of carding cloth to a flat plywood board, add a batten along the bottom to brace against, and use two dowels to roll the rolags off. Carding cloth is the only part you cannot improvise, and it is sold by the piece.