Wet Felting a Bowl: Resist, Shaping and a Base That Stands
9 min read Intermediate
We may earn a commission from links on this page, at no extra cost to you. As an Amazon Associate I earn from qualifying purchases. Learn more.
A felted bowl is a closed pocket with a hole cut in the top. The making is easy; getting it to sit flat and hold its walls up is the part worth reading about.
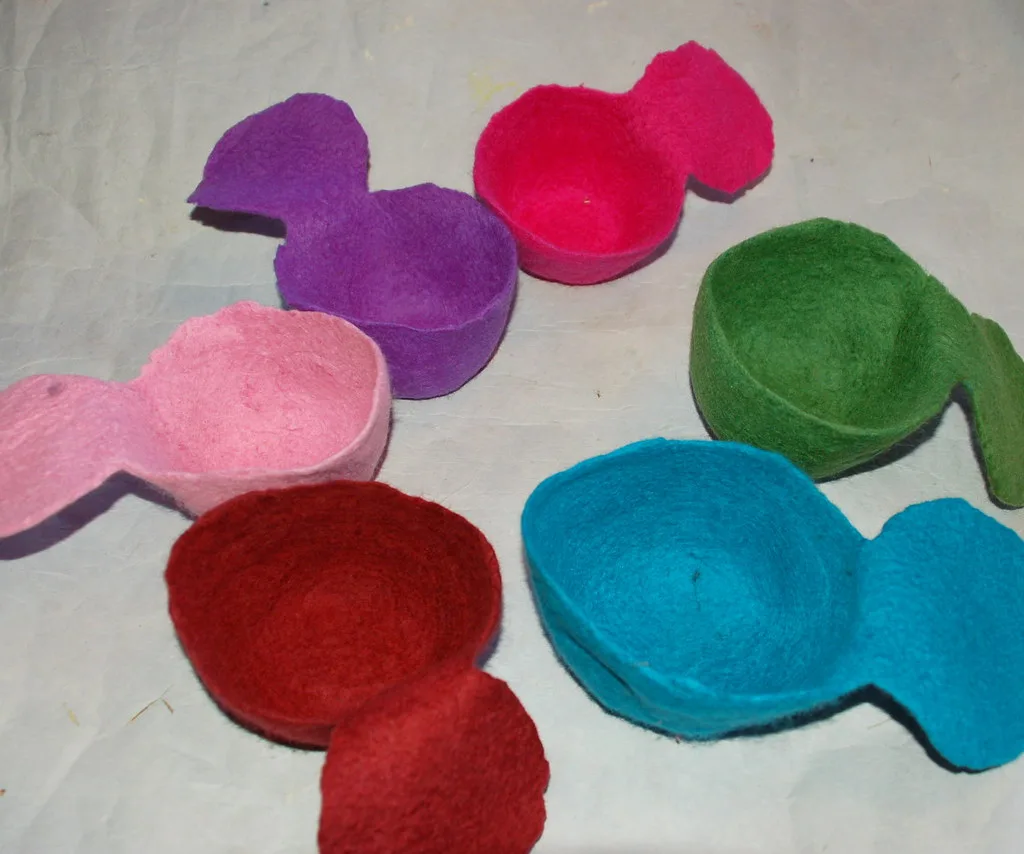
Felted bowls hold keys, wool, fruit and jewellery, and they are the best first resist project there is. Everything you learn making one applies directly to bags, hats and slippers, and if it goes wrong you have lost 100 g of wool rather than an afternoon of knitting.
What you need
- 80–120 g of wool tops. Corriedale or a medium wool is easier here than merino — you want stiffness, not softness
- A resist: thin foam camping mat or several layers of bubble wrap
- Bubble wrap to work on, and net curtain
- Warm soapy water
- A bamboo mat or towel for rolling
- A former to shape over: a bowl, a jar, a tin, a balloon
How many ounces of wool does it take to wet felt a small bowl?
A small bowl 4 in (10 cm) across takes about 1 to 1½ oz (30 to 45 g) of wool tops; a 6 in (15 cm) bowl takes 2 to 4 oz (55 to 115 g). The low end gives a soft bowl that holds its shape but gives under the hand; the high end gives the four-layers-a-side bowl that stands up stiff on its own.
The weight does not change during felting, apart from a gram or two of fibre lost in the rinse water. Shrinking turns the same wool into a smaller, thicker, denser wall. So the amount depends on the bowl's surface area and how thick you want the wall, and the surface area grows with the square of the diameter: doubling a bowl's width needs four times the wool.
| Finished bowl, across the rim | Soft walls | Stiff walls that stand alone | Round resist (30–35% shrinkage) |
|---|---|---|---|
| 3 in (7.5 cm) | ½ oz (15 g) | ¾ to 1 oz (20 to 30 g) | 4¼ to 4½ in (11 to 12 cm) |
| 4 in (10 cm) | 1 oz (25 to 30 g) | 1½ to 1¾ oz (40 to 50 g) | 5¾ to 6¼ in (14.5 to 15.5 cm) |
| 5 in (12.5 cm) | 1½ oz (40 to 45 g) | 2 to 3 oz (60 to 80 g) | 7 to 7¾ in (18 to 19.5 cm) |
| 6 in (15 cm) | 2 oz (55 to 60 g) | 3 to 4 oz (85 to 115 g) | 8½ to 9¼ in (22 to 23.5 cm) |
| 8 in (20 cm) | 3½ oz (100 g) | 5½ to 7 oz (150 to 200 g) | 11½ to 12¼ in (29 to 31 cm) |
| 10 in (25 cm) | 5½ oz (160 g) | 9 to 11 oz (250 to 310 g) | 14¼ to 15½ in (36 to 39 cm) |
The weights assume a bowl about half as deep as it is wide. A shallow dish only a quarter as deep as its width has about a third less surface, so it needs about a third less wool. Big bowls also need proportionally thicker walls to hold up their own weight, so from 8 in (20 cm) upwards use the stiff column even if you want a soft look.
Split the weight evenly between the two sides of the resist, and then between the layers on each side: 3 oz (85 g) over four layers a side is about ⅜ oz (10 to 11 g) per layer. Weighing each layer on a kitchen scale is the easiest way to get even walls. If you have a felted bowl you like, weigh it; that is the amount of dry wool you need to make another the same.
Cutting the resist
For a round bowl, cut a circle about one and a half times the finished diameter: the finished size divided by one minus the shrinkage rate. A 6 in (15 cm) bowl in Corriedale, which shrinks 30 to 35%, wants a resist of about 8½ to 9¼ in (22 to 23.5 cm). Round the edge smoothly; any flat spot or corner shows in the finished wall.
For a bowl with a flat base, cut a shape like a wide U — a rectangle with a rounded top. The straight bottom edge becomes the base.
The general rules for sizing and materials are in resist felting.
How to make a wet felt bowl pattern
A bowl pattern is one number: the resist size, which is the finished size ÷ (1 − shrinkage rate). For a round bowl about half as deep as it is wide, the finished size to put into that sum is simply the bowl's diameter, so a 6 in (15 cm) bowl in wool that shrinks 33% needs a circle 6 ÷ 0.67 ≈ 9 in (23 cm) across.
That works because a flat round pocket and a hemisphere of the same diameter have the same surface area. When you push the pocket out over a round former, the wool rearranges into the dome without needing to grow or shrink. A shallower dish uses less of that area, so the same resist gives a slightly wider, flatter bowl.
- Decide the finished diameter across the rim.
- Pick the rate for your wool. Merino fulled hard shrinks 35 to 45%, Corriedale 30 to 35%, coarse wool 25 to 30%. If you have felted a test square of this wool, use your own figure instead.
- Divide. Diameter ÷ (1 − rate). Adding the percentage instead of dividing by it is the common slip, and on a 6 in bowl it comes out about 1 in (2.5 cm) too small.
- Draw the circle on floor underlay with a pencil tied to a string, pinned at the centre, the string half the resist diameter long.
For the flat-based U shape the maths changes, because the opening is a straight cut. A pocket cut straight across opens into a rim whose circumference is twice the pocket's flat width, so the rim diameter is about two thirds of that width. Work backwards:
- Finished flat width = rim diameter × 1.57. A 6 in (15 cm) rim needs a pocket about 9½ in (24 cm) wide.
- Finished flat height = the depth you want + half the base diameter, because pushing the base out flat uses up that much of each wall. For a 3 in (7.5 cm) deep bowl with a 6 in base, that is 6 in (15 cm).
- Divide both by (1 − rate): at 33%, about 14 × 9 in (35 × 23 cm) of resist.
Wool rarely shrinks the same amount both ways, since it shrinks most along the direction you roll it (the reasons are in wool shrinkage when felting), so treat the pattern as a starting point and correct the size during fulling.
For very small pods and bead-sized vessels, a flat pattern is fiddly. A ball makes a three-dimensional resist instead: wrap the wool round a small balloon or a ping-pong ball, felt it, then cut an opening and pull the deflated balloon or squashed ball out.
Layering the wool
- Lay the first layer over the resist with the fibres running one way, overhanging the edge by 3 to 4 cm all round.
- Second layer at right angles, same overhang.
- Wet through with warm soapy water and press flat until dark and airless.
- Turn the whole package over. Fold the overhanging fibres onto the back and smooth them down.
- Repeat two layers on this side, overhanging, wet, press, fold the overhang to the front.
- Add a third and fourth pair of layers if you want a bowl that stands on its own. Two layers per side gives a floppy pouch.
Check the folded edges by feel. Thin patches along the fold are the usual failure point and take five seconds to fix now with a wisp of wool.
Felting
Cover with net and rub gently in circles, both sides, for ten minutes, until the surface holds together when you pinch and lift.
Then roll: wrap the whole package in a bamboo mat or towel and roll 50 times, unwrap, turn 90 degrees, and repeat. Four rounds each side. Add hot water whenever it cools.
Cutting the opening
Test by pinching and pulling — if fibres separate, keep felting. When it holds firmly, cut.
- Round bowl: a circle or a straight slit across the top third.
- Flat-based bowl: straight across the top.
Ease the resist out, then reach inside and smooth all the internal surfaces flat.
Fulling — where the bowl becomes a bowl
This is the stage most people cut short, and it is what separates a bowl from a floppy pouch.
- Work the piece hard in hot soapy water: rub it against a ridged surface, throw it into the sink, squeeze and knead it.
- Alternate hot and cold water. The temperature shock contracts the fibres noticeably.
- Keep going until the fabric is stiff. Not solid, not firm — stiff. It should stand up on its own before you shape it.
- Work the cut edge deliberately, rolling it between your fingers so it firms up and looks finished.
Expect 30 to 40% shrinkage in total. If the bowl is coming out too big, the answer is always more fulling.
Can you add another layer to a wet felted bowl to make it thicker?
Yes, while it is still soft; much less well once it is fully fulled. New wool bonds by its fibres working down into the felt underneath, and a bowl that has only been felted (it passes the pinch test but still bends easily) has loose surface fibres for them to tangle with. A bowl that has been fulled stiff is so dense that new fibres only catch on its surface, and that thin join tends to peel or pill once the bowl is handled.
So the best time to thicken a bowl is the moment you notice it is too thin: after cutting the opening, before the hard fulling. To add a layer:
- Wet the bowl through with hot soapy water, so it is soft and the fibres can move.
- Rough up the surface you are adding to with a stiff brush or a pet slicker brush, until a light fuzz stands up.
- Lay two thin layers rather than one thick one, fibres crossed, over the outside or the inside. Thin wisps grip; a thick wad sits on top and slides.
- Anchor them, either by needle felting lightly over the whole area with a coarse needle, or by laying net over them and rubbing very gently with soapy fingers for several minutes before any pressure.
- Felt, then full as normal. The bowl underneath has already done most of its shrinking and the new wool has not, so the new layer pulls in tight as it fulls. Lay it slightly generously at the rim, or it can draw the opening smaller.
On a bowl that is finished and dry, the honest answer is that an added layer will never be as strong as wool laid in the first place. If the goal is stiffness rather than thickness, a wash of diluted PVA or a starch stiffener inside is the better fix. If it is a soft bowl you would rather have thick, make another with the extra layers from the start and keep the first one for something light, such as yarn or dried flowers. Needle felting first and wet felting afterwards is covered in more detail in can you wet felt after needle felting.
Shaping
Rinse the soap out in cool water and squeeze — do not wring. Then, while still damp:
- Push it over your former and smooth the walls into position.
- For a flat base, press the bottom firmly down on a table and hold it there for a moment.
- Roll the rim outwards or inwards for a lip, or leave it straight.
- Leave to dry completely, standing on the flat surface. Two days for a thick bowl.
Wet felt keeps whatever shape it dries in, which is the whole reason this works.
Variations
- Colour inside and out. First two layers in one colour, last two in another. The cut edge shows both.
- Nesting bowls. Three resists in graded sizes.
- Inlay. Cut prefelt shapes and lay them on the outer layer before wetting.
- Rolled rim. Add an extra wisp of wool around the opening edge before cutting, so there is enough fibre to roll.
- Stiffened. A wash of diluted PVA on the inside makes a very rigid vessel, at the cost of the wool's feel.
Caring for it
Brush the dust off rather than washing. If it must be washed, hand wash cool with no agitation and reshape over the former while damp — a felted bowl left to dry in a heap dries as a heap.
Frequently asked questions
How much wool do I need for a felted bowl?
Around 80 to 120 g for a bowl 15 cm across. Thin bowls collapse, so err upwards — four layers of wool per side rather than two.
Why does my felted bowl not stand up?
Almost always under-fulling. A bowl needs to be felted much harder than a scarf — until the fabric is stiff rather than merely solid. Shaping it over a form while damp and letting it dry completely does the rest.
Can you wet felt a bowl without a resist?
You can felt a flat disc and mould it over a bowl while wet, which gives a shallow dish. For anything with real depth and vertical walls, a resist is the only practical method.
How do you get a flat base on a felted bowl?
Shape it over a flat-bottomed former — a jar, a tin or a bowl with a flat base — and press the bottom down firmly on a table while damp. Let it dry standing on that flat surface, not on a towel.
Can I add another layer to a bowl I have already wet felted?
Yes, if it is not yet fully fulled. Wet it with hot soapy water, rough the surface with a stiff brush, lay two thin crossed layers, anchor them with gentle rubbing or light needle felting, then full as normal. On a bowl already fulled stiff, new wool only bonds to the surface and tends to peel, so stiffen it with diluted PVA instead.